
One of the interesting problems I had to solve during development of Summer Catchers was implementation of Lens Flares effect. In this post I’d like to share what I came up with (including an open-source demo). Buckle up.
SummerCatchers is a 2D game with a minimalist art style. That’s why my primary task was not a photorealism. Instead I had to find out a fast to implement, easy to use and high-performance solution.
Unity3d has a built-in ‘LensFlare’ effect for ages. Unfortunately, since this effect is based on Colliders, this solution does not fit “easy to use” requirement. Just imagine that you’ll have to manually set all the colliders for each object which may occlude the sun. Moreover, the majority of them would be Mesh Colliders, which in turn may violate “high-performance” requirement.
So I had to figure out the way to know if the object is occluded by other objects with minimal efforts:
- just a few scripts/components,
- utilize GPU as much as possible,
- O(1) complexity for the end-user (e.g. no matter how many occluders you have in a scene, you still have to do a constant number of actions to enable the effect).
The idea is to have some sort of occlusion buffer (i.e. texture) which is used in flare’s material to somehow modify its look when the light source is fully visible or partially or completely occluded. By “light source” here I mean some object which produces the lens flares. In our case it’s just a sprite of the sun.
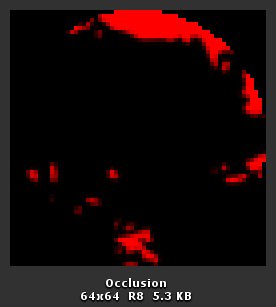
Occlusion buffer
As you can see the light source (red circle) is partially hidden behind some objects (rendered in black). Let’s see how this was achieved.
Unity has a very handy concept called Rendering with Replaced Shaders. In short, the camera renders all the objects as usual except the shaders are replaced with the provided one. This is exactly what we need to distinguish the occluders and objects being occluded (in the demo project I call them “occludies” which may be totally wrong, but anyway).
So what does this tiny script actually do? First of all it disables the ‘occlusion camera’ just in case you forget to do it in the Inspector (we don’t want Unity to use this camera as usual, because that’s we who command it to render). Next, in Update method we fit the camera to the bounds of the target (the light source) in order to make the target fit the occlusion buffer as tight as possible. Then we just make the camera render the scene with the special shader.
What’s so special with this shader? Remember that we need to distinguish the occluders and occludies? To achieve that we have two subshaders: the first one (for occluders) renders the object in black ( fixed3(0.0, 0.0, 0.0) ), the other one (for occludies) renders the object in white ( fixed3(1.0, 1.0, 1.0) ).
But how does Unity know which subshader to use? The subshader is selected depending on the tag passed to Camera.RenderWithShader method. In our case it’s ‘RenderType’. For occluders I use ‘Transparent’ because in Unity default material for sprites uses this render type. For occludies - it is ‘Occludie’.
Also we need a tiny shader for occludie the only purpose of which is to contain ‘RenderType’ tag. That’s why this shader does nothing but clipping all the fragments.
Ok, now we have an occlusion buffer, what’s next? How can we use it to make flares fade in and out depending on the “occlusion ratio”? How can we convert the data from the occlusion buffer to this “occlusion ratio”?
And here comes the beauty and the glory of Mipmapping. We don’t need to manually read the pixels from the buffer, because it would kill all the performance due to necessity to read the GPU-based data by CPU. We neither need to manually shrink the NxN texture into a 1x1 one. Everything is done automagically on the GPU side: we just render into the RenderTexture and get the sequence of progressively downscaled copies of that image right down to 1x1.
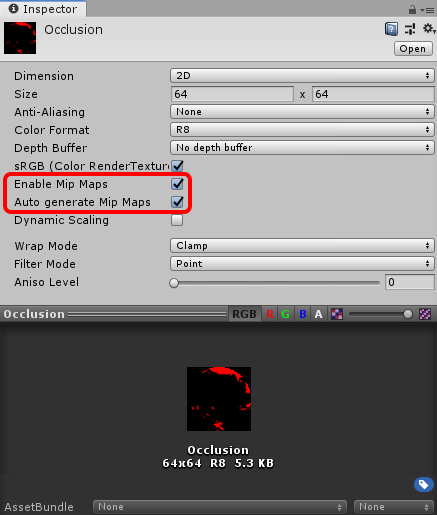
Enabling mipmaps
What does it actually mean in our case? It means that we can lookup the coarsest mipmap level of the occlusion buffer by any coordinates (becuase its size is 1x1) and use that value as an occlusion ratio.
In this snippet (check the full shader in the demo project) I calculate the ‘intensity’ of the flare. First of all I get the coarsest mipmap level and then use it to lookup the occlusion buffer. Then I take into account that the round light source can’t fill the whole area of the rectangular texture (i.e. the texel can’t have the value greater than 0.7853).
And that’s it! Now this ‘intensity’ value can be used to smoothly fade in and out the lens flares by adjusting their opacity or scale (or whatever your imagination is capable of).
Update [14 Jan 2020]
Regarding the texture format of the occlusion culling. Initially I used RFloat (R32_SFLOAT), but it appeared that not all GPUs/drivers (mainly mobile ones) support mipmap generation for this format.
Then I decided to try RHalf (R16_SFLOAT), since according to OpenGL ES3.0 (pages 130-132) and Metal (pages 6-7) specifications this format supports filtering, thus should work with mipmap generation. Unfortunately, in some cases (e.g. on AppleTV 4g) it still did not work.
So I ended up with R8 which on one hand should be (I hope) supported by majority of GPUs and on another hand should be enough with its 256 possible values.
Also the more advanced solution probably would be to check whether the GPU supports a given texture format by using SystemInfo.IsFormatSupported with FormatUsage.Linear.